

DIY Peter Pan Mobile
/


One of my oldest and dearest friends is pregnant, due in April. She’s always loved Tinkerbell, so she chose to decorate her nursery with a Neverland theme - umm, sign me up for decorations! I offered to make her a version of this mobile that she found on Pinterest. She called me about a week later to tell me that she’s having twin baby boys!! TWO mobiles!!
I had been wanting to make the doilies anyway, but didn’t know what I would use them for until this idea came along. My finished product ended up nothing like the inspiration, but I think they came out awesome.
The Doily Dreamcatchers:
To be clear, these can be made without the doily. I just like them.
Supplies:
Metal rings from Michaels. Something like this, but mine are 10”
Crochet thread. For doilies I typically use size 10, something like this
A tapestry needle
Beads - I used crystal beads and size 6 seed beads. You can’t really see them in the pictures, which is a bummer.
Crochet hooks: sizes F and 7mm (see pattern for when to use which hook)
Ribbon - mine was half an inch across
Step 1: Make the Doilies
Step 2: Tie Doilies to the Metal Ring
I used a tapestry needle and more cotton thread to wind around the metal ring and through the edges of the doily to hold it to the ring. The Crowns Surround doily is barely big enough to stretch out on the ring I used - the finished dreamcatcher is super tight, which is good, but it was a bit difficult to get it to cooperate.
Step 3: Wrap the Ring in Ribbon
Using evenly spaced natural holes in the doily pattern, I wrapped the ribbon around the ring, keeping it semi-loose so it would cover well. I left a long tail at the beginning, so I just tied a bow when I got to the end.


The Silhouettes:
Supplies:
Black art board, something like this. Basically just the maximum level of thickness that I thought my Cricut could handle is what I got.
Glossy Mod Podge
Black glitter
Black crochet thread. I used size 10 again.
Step 1: Cut Out the Shapes
Using my Cricut Design Space files, I cut out the shapes for the mobiles.
Cricut setting: Light Chipboard (0.55mm), on extra pressure. I also changed it to 3x in the cut settings.
Pirate Ship scene: https://www.pinterest.com/pin/413416440791263256/
Big Ben scene: https://www.pinterest.com/pin/413416440791263187/
I cut out two of every shape so that I could put the string to hang them between the two pieces.

All of the pieces cut out for the pirate ship mobile (+ some glitter)
Step 2: Build the Hanging Silhouette
First I cut as many 2.5’ lengths of string as I needed to have 1 per silhouette. With the pirate ship, 7.
With Mod Podge, I painted one complete side of a silhouette shape. Had to make sure to work quickly here; it was starting to dry by the time I was done painting.
After the one side was painted with Mod Podge, I placed the end of one of the strings, starting from where I wanted the shape to hang from, to as far into the shape as I could. In some cases I doubled it over, or tied a knot to make sure the string would stay put for good.
Then I put the other (dry) side on top (making sure to put it facing the same way as the first side!). Then I pressed both sides together until there was no lifting at the edges.


Step 3: The Glitter!
No project of mine would be complete without glitter. I asked my friend if I could add glitter, and she said “only on Tinkerbell.” Ok, ok. They are boys, after all. I was just going to do the edge of Tinkerbell in silver glitter, but then I found this awesome black glitter that I have, and my husband said I should just cover Tinkerbell with that. You don’t have to tell me twice to cover something in glitter.
After I made the hanging Tinkerbell silhouette, I let it dry for about 30 minutes, then painted one side with a thin layer of Mod Podge.
Then I poured some black glitter out on top of the Mod Podge’d Tinkerbell, and tapped it down with my finger.
Once the Mod Podge/glitter dried, I painted the whole side again with glossy Mod Podge to make sure the glitter would stay put forever, and not get all over the babies.
I let that side dry, and then flipped it over and repeated.


The Mobile
Supplies:
Thick string/cord.
Ribbon. Same ribbon as before.
Dangling star-shaped charms
Step 1: The Hanging “Hardware”
Starting with a piece of cotton string that was about 15’ or 20’, I tied one end to the ring behind where I had tied the bow, leaving some extra tail on the string for another bow later. We’ll call that spot 12:00 on the doily ring.
From there, up and over my finger, and down to 6:00 on the doily ring. I went in on the inside of the doily ring and came back up on the outside.
Then up and over my finger again, down to 9:00 on the doily ring.
Under the ring and back up over my finger to 3:00 on the ring.
Under and back over to 12:00 on the ring, where I tied it in a bow with the beginning string (like I promised earlier).
Using ribbon, I tied a loop around where my finger was holding the strings. This way, the mobile is totally adjustable, and my friends have plenty of string to make it longer if they want, and can cut it to make it shorter. I could also replace this with a d-ring or something similar. I may do that. Good job, me.

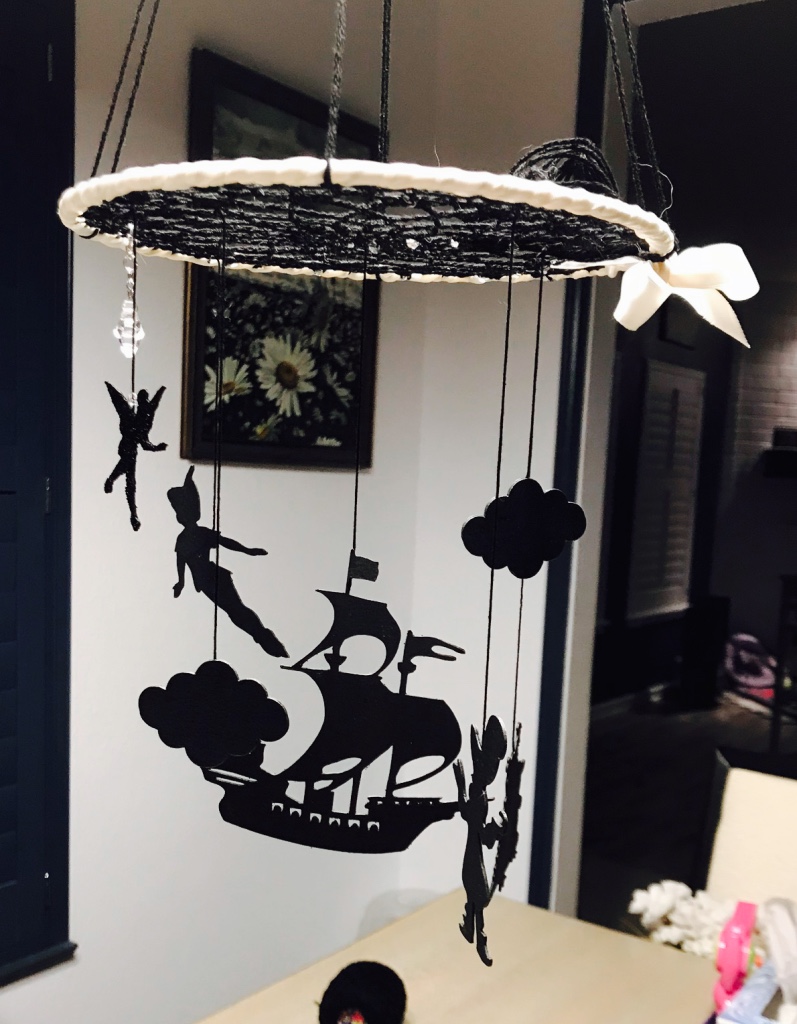
View from the top
Step 2: Place the Silhouettes
My husband helped me hang the doily from our dining room table light fixture (he makes so many sacrifices for my crafting habit) so I could play with where I wanted the shapes to hang.
I loosely tied the string for each silhouette shape where I thought I wanted it to hang from the doily, and then adjusted from there. I used the top of the doily like a shelf to hold the extra string while I adjusted things.
Once I had chosen their final places, I tied the string in a knot and cut it short.
The last hanging detail I added was a moonstone star to represent the North Star. I randomly found a package of 2 at Hobby Lobby when I went for the art board, so I’m pretty sure the universe wanted one more sparkly thing on these. They’re on lobster claw clasps too, so my friend can move them around if she wants.


That’s it! Easy right? As you can see, they’ve been baby tested - Mary loves these things, I may have to make her one now.